Have you ever seen fringes of colors around the subject of a photograph? That is chromatic aberration. It’s a common optical problem in photography that happens when different colors of light do not come together as they should in your lens. Fortunately, you can fix chromatic aberration in both Photoshop and Lightroom in a few easy steps.
How to Fix Chromatic Aberration in Photos
Chromatic Aberration Photoshop Fix:
- Duplicate the Background Layer and Select Portion of Image to Use as a Fix
- Enlarge Your Selection to Cover the Problematic Area
- Subtract the First Selection from the New Selection
- Add a Layer Mask and Blur if Needed
Chromatic Aberration Lightroom Fix:
- Open the Lens Correction Panel
- Use Options on the Basic Tab First
- Move to the Profile Tab
- Go to the Color Tab
What is Chromatic Aberration?
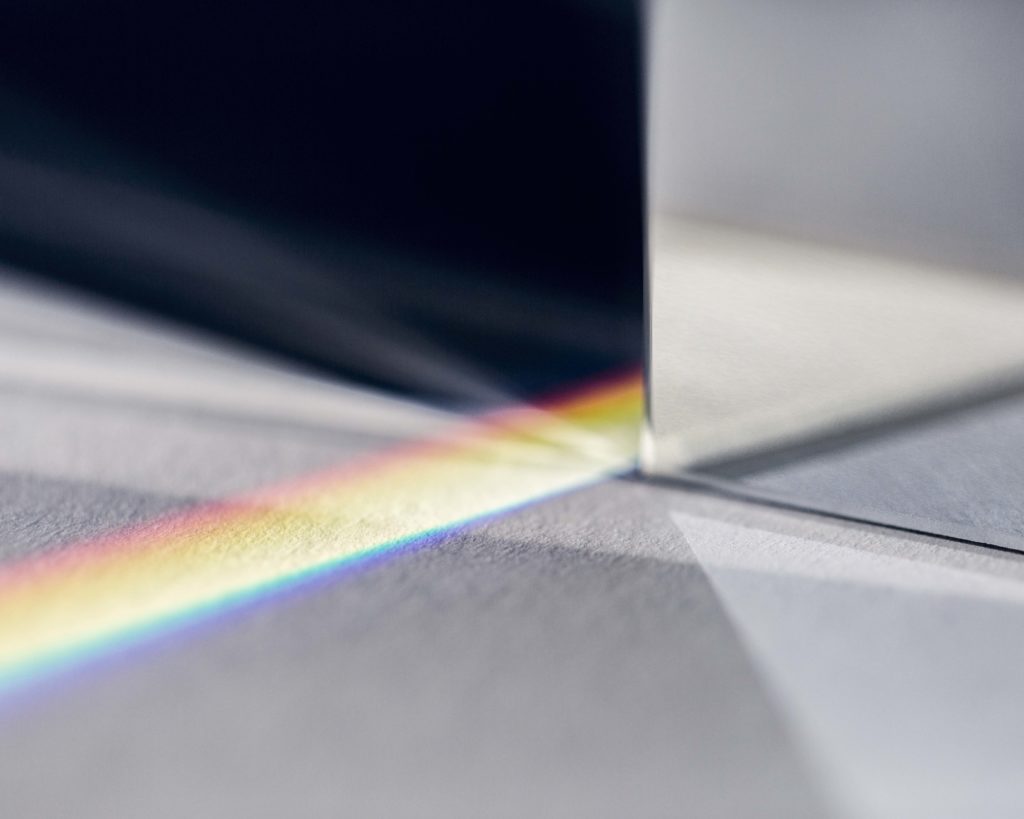
Also known as color dispersion or fringing, chromatic aberration occurs when lenses do not refract—or bend—different wavelengths of color in the right way. When you take a photograph, wavelengths of color should join together at your sensor’s focal plane so that they can be detected by the image sensor correctly. If different wavelengths of color arrive before or after the focal plane, this causes chromatic aberration.
It’s important to know that chromatic distortions can also occur in black and white photography, but they are called defocus aberrations. In those scenarios, elements will appear out of focus. This problem exists beyond photography—and can affect viewing through a microscope or telescope.
Think of your lens like a prism. When visible light enters, it gets split into a spectrum of various wavelengths of light, or colors. Instead of all of the different wavelengths meeting up at the same point, color rays focus at different points. This can cause a telltale fringe of colors to appear around objects in photos.
There are two primary types of chromatic aberration—lateral and longitudinal. With longitudinal or axial chromatic aberration, the lens does not focus different colors of light in one focal plane. This occurs because the focal points of the colors are at different positions in the longitudinal direction of the optical axis. With lateral chromatic aberration, all the colors of light do focus on the same plane, however, they are not positioned on the optical axis. While longitudinal chromatic aberration leads to colored areas in an image, lateral chromatic aberration produces fringes around an object.
In lens design and optical engineering, manufacturers strive to have all the different possible light rays arrive at the same point at the same time. Unsurprisingly, this is quite difficult to achieve.
If you took apart your lenses, you might find more than a dozen lens elements designed to correct and guide light rays on their journey from your lens and camera sensor. These elements may include a positive lens, which is thicker at its center and thinner at its edges to help light converge.
Any missteps in this precise process can cause chromatic aberration. At times, design or defects in glass elements can make chromatic aberration an unfortunate, regular occurrence. Keep in mind, however, that almost every lens is susceptible to chromatic aberration in some scenarios, even high-end, expensive ones.
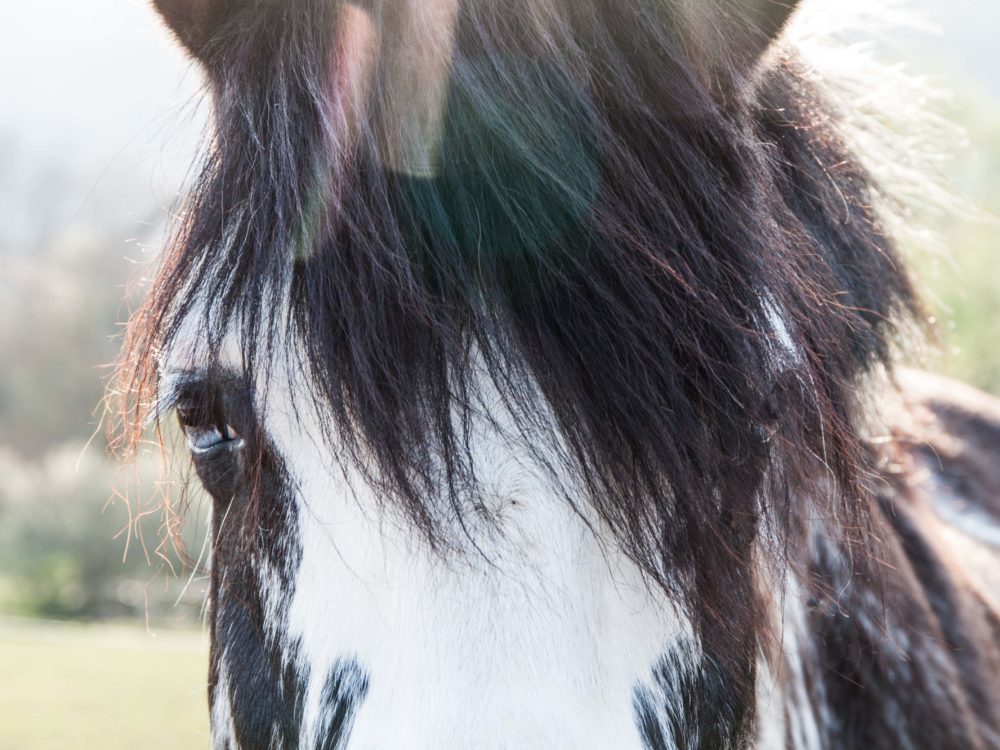
You are most likely to encounter chromatic aberration when you photograph a dark subject against a bright background. This can include situations when the light source is behind the subject or any shots against bright skies or white backdrops. While you can avoid these shooting situations, you may find that limiting. You should also know how to remove chromatic aberration when it does occur.
Now that you understand what causes chromatic aberration, you can find out how to fix it. Fortunately, chromatic aberration correction is possible with today’s most respected photo editing software, Photoshop and Lightroom.
Overall, Lightroom provides an easier fix for relatively mild issues. Chromatic aberration correction in Photoshop requires more skill but offers more precise results.
Also, with Photoshop lets you add a chromatic aberration effect if you want it in your photos. You can definitely achieve some unique looks with deliberate chromatic aberration photography if that is your intent.
Photoshop Chromatic Aberration Removal
For addressing severe chromatic aberration, Photoshop is the best choice for fixing your image. Follow these steps:
Duplicate the Background Layer and Select Portion of Image to Use as a Fix
Start by creating a copy of your background layer. Select Layer > Duplicate Layer.
Take a close look at your image. You’ll be selecting the elements of the image that you will use to fix the chromatic aberration issue. If your image is a dark subject on a bright blue background, you’ll select the blue background and then use it to cover up the area with the chromatic abnormality.
You can select an area with the Quick Selection tool. Now you need to save it as a selection by clicking on Select > Save Selection and identifying it with a name.
Enlarge Your Selection to Cover the Problematic Area
Next, you need to make your selection larger so that it overlaps the chromatic aberration. You can choose Select > Modify > Expand. This lets you specify the number of pixels you will need to cover over your problematic area. Each photo will require a different number of pixels depending on the size of the chromatic issues.
Subtract the First Selection from the New Selection
Now you need to subtract your original selection from your new selection. Do this by clicking on Select > Load Selection and choosing the layer with the background. Click on Subtract from Selection and then choose OK.
Add a Layer Mask and Blur if Needed
With the layer with the background still selected, click on the Add Layer Mask icon on the Layer Palette. This will isolate the area with the chromatic aberration. Now you can desaturate that area. Select the top layer and click Image > Adjustments > Hue/Saturation. Change the hue and saturation to address the chromatic problems.
At times, this can create a harsh edge where your subject meets the background. To fix this, click on the mask thumbnail then select Filter > Blur > Gaussian Blur.
Lightroom Chromatic Aberration Removal
When handling mild chromatic aberration, Lightroom may be the more straightforward tool to use. Chromatic aberration in Lightroom is usually a quick and easy fix. All you need to do is click the right boxes and let Lightroom remove chromatic aberration issues from your photos.
Open the Lens Correction Panel
The first step in fixing chromatic aberration with Lightroom is navigating to the Lens Correction Panel. Go to Develop Mode and scroll down if needed. You’ll find the Lens Correction Panel between the Detail Panel and Effects Panel.
Note that the Lens Correction Panel has four sections. You’ll work through the first three panels from left to right. Also note that you can use the Lens Correction Panel to address other lens distortions, such as vignetting and barrel distortion.
Use Options on the Basic Tab First
Click on the Basic Tab first. Choose options for Enable Profile Corrections along with Remove Chromatic Aberration. You’ll note that the software will automatically reduce chromatic aberration. That is because the software has built-in profiles for major cameras and lenses, so it knows how to adjust for common defects.
Move to the Profile Tab
Next, move to the Profile Tab and make sure that the box for Enable Profile Corrections is selected. You should also determine if Lightroom has correctly identified your camera lens manufacturer and model. If it hasn’t, you can make a manual selection. And if your lens is not listed, select the Setup option and move the slider for Distorting and Vignetting to make manual corrections.
Finish on the Color Tab
On the Color Tab, make sure that Remove Chromatic Aberration has been selected. In many cases, this is the only step you need to take. However, if you need to do any further touch-ups to address chromatic issues move each slider until you see the fringes of color disappear.
How to Prevent Chromatic Aberration
While you can remove chromatic aberration, you can also take steps to avoid it while shooting. These practices can help you spend less time making fixes in post-production and give you more time to take photos.

Avoid High Contrast When Possible
The first thing to do is to avoid high contrast situations whenever possible. Instead of shooting against a white backdrop, for example, you should switch to a darker background. When you’re shooting on site, let some time pass until lighting conditions are more favorable.
When that isn’t an option, be sure to shoot camera RAW and prepare for the need to correct chromatic aberration during post-production. Sometimes applying high-quality Lightroom presets can provide a quick and effective fix to your chromatic aberration issue and enhance other elements of your image.
Be Careful with Zoom Lenses
Many photographers can’t wait to add specialized wide-angle lenses or zoom lenses to their tool kit. But every lens has a learning curve, and some are especially susceptible to chromatic aberration.
With a zoom lens, aberration can occur at the ends of their focal ranges. In addition, you may see chromatic issues and other defects start to appear when using zoom lenses at a wide angle. You may find prime wide-angle lenses are a better choice.
Also, you can buy an achromatic lens that fits on top of a camera lens and prevents chromatic aberration. Often, photographers who explore macro photography use these lenses for magnification to take close-up images that are free of chromatic distortions. This most common type of achromatic lens is called an achromatic doublet. Typically, the best quality achromatic doublet lenses feature low dispersion glass made of fluorite to yield strong correction of chromatic aberration.
Decrease Your Aperture
If you are starting to experience noticeable chromatic issue while shooting, you can try decreasing your aperture. In fact, this will help address any aberration caused by lens defects.
Of course, you may have to make other adjustments to account for the loss of light caused by the stopped-down aperture. Consider lowering the shutter speed or increasing ISO to compensate. Adding light through your camera flash or other sources is another viable alternative.
Place Your Subject in the Center of Your Frame
Chromatic aberrations and other lens-related defects are more likely to occur when your subject is further away from the center of a frame. That means you can often eliminate the issues by keeping your subject in the center of your image.
Often, this means you may need to crop your photo to achieve the look and composition you desire. This is one of the simplest methods of chromatic aberration correction that photographers of any skill level can perform.
Understand How to Fix and Prevent Chromatic Aberration
If you see fuzzy purple or magenta fringes around the subjects of your photos, don’t be alarmed. Instead, know that you have encountered one of the most common issues that arise in photography called chromatic aberration or color dispersion. It happens when various wavelengths don’t meet at the same convergence point as they should. Fortunately, it’s a problem you can correct in post-production.
For simple corrections, turn to Lightroom. To remove chromatic aberration Lightroom lets you access information about popular lenses within its Lens Correction Panel. It’s a reasonably simple process that requires only a few clicks, so don’t feel intimidated.
Correcting chromatic aberration in Photoshop is more involved and will likely take you more practice to master. Save Photoshop chromatic aberration correction for more complex issues and defects. And whenever you want to add chromatic aberration, Photoshop lets you do that, too.
If you don’t want to have to spend time removing chromatic aberration, try using certain techniques to avoid it while shooting. One important tip to remember is to avoid high-contrast situations since a dark subject on a bright background is vulnerable to chromatic aberration. You can also step down your aperture or position your subject in the middle of your frame.
With any lens, chromatic aberration or color dispersion can occur—but be mindful when shooting with zoom lenses. Chromatic issues and other defects pop up at the shortest and longest focal length or when shooting at wide angles. Try adjusting focal length or consider prime wide-angle lenses if you bump into frequent issues.
It’s inevitable you’ll encounter chromatic aberration on your photography journey. Sometimes you may embrace it—or you can even add it to photos with the Photoshop chromatic aberration effect. But most photographers try to avoid these kinds of optical distortions in their photos.
Fortunately, to remove chromatic aberration Photoshop and Lightroom are available to meet your every need. You can perfect the colors in every photo with some proven shooting techniques and the right photo editing software.