When it comes to photography basics, ISO is one of the fundamental concepts that every photographer needs to know. You may hear people refer to ISO as one of the three elements of the exposure triangle in photography—along with shutter speed and aperture. Once you learn how to adjust your ISO camera controls, you’re on your way to taking better pictures.
3 Steps to Adjust ISO Settings on a Camera
- Learn Basic Facts about ISO
- Select a Mode that Lets You Change ISO Camera Settings
- Find Out When to Use High or Low ISO Camera Settings
Many new photographers struggle to understand camera ISO when they are just starting out. Like other photography concepts, you can understand ISO theoretically, but you gain much more knowledge from practice. Once you feel confident controlling the ISO camera function, you’ll see an immediate improvement in your photos. 3
What is ISO on a camera? The simple definition is that ISO is a setting that affects the image brightness or darkness in every shot. Whether you are using an analog camera or a digital camera, ISO means the same thing. It describes how sensitive your image sensor is to light.
Together with shutter speed and aperture, ISO can dramatically affect the appearance of the photos you take. Understanding camera ISO is one of the first steps you need to take in your photography journey.
1. Learn Basic Facts About ISO
As you might expect, ISO is an acronym. It stands for “International Organization for Standardization.” Wonder why? That organization is an international governing body that sets standards for many items, including camera sensors.
That fact ensures that if you select the same ISO setting on different cameras, you’ll achieve the same sensitivity to light for each sensor. In the past, ISO was known as film speed—and it’s measured in the same type of number scale.
When you adjust your ISO camera controls, you are making your sensor more or less sensitive to light. Like aperture and shutter speed, ISO is measured in increments called “stops.” For most modern digital cameras, standard ISO camera stops ranges between 100 to 12,800. Some high-end cameras have sensors with ISO values into the hundreds of thousands.
As you increase ISO by one stop, you double you double your sensor’s light sensitivity. If you start with an ISO camera setting of 100 and move to 200, that is a one-stop increase. You’ll double your sensitivity. Moving from 200 to 400 is another one-stop increase—and two-stops over your original ISO setting of 100. And camera ISO 6400 is six stops higher than camera ISO 100.
Here’s a basic camera ISO chart that shows common stops on contemporary cameras:
- 100 (Lowest light sensitivity)
- 200
- 400
- 800
- 1,600
- 3,200
- 6,400
- 12, 800 (Highest light sensitivity)
You should always know the base ISO—or lowest native ISO value of your camera. For many contemporary cameras, the base ISO is 100. At this setting, you’ll be able to produce the highest-quality image with minimal noise. However, you’ll find that this base ISO won’t work in every shooting situation. And that’s why learning to adjust your ISO camera controls is important.
2. Select a Mode that Lets You Change ISO Camera Settings
After you understand the purpose of ISO, you’ll want to know how to adjust your ISO camera controls. Many models let you change ISO in camera—but the specific steps may vary. Here are some actions you may need to take to adjust ISO camera controls.
First, make sure that you are in a mode that lets you select your own ISO settings. You can’t adjust camera ISO if you shoot in auto mode. You may need to select manual mode, aperture priority, shutter priority, or program.
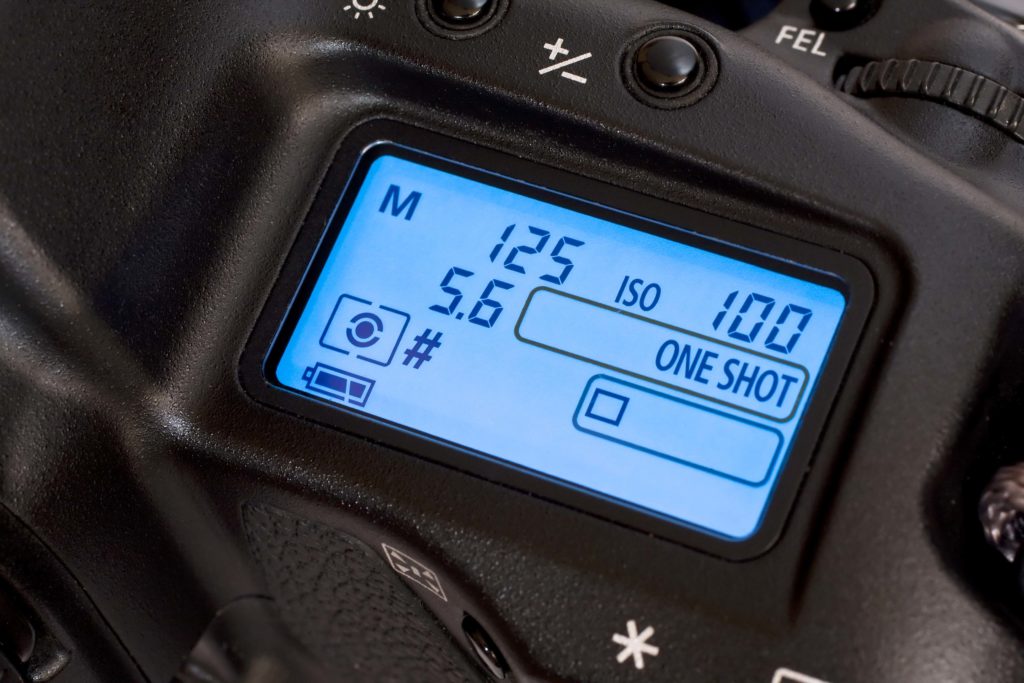
If you have an entry-level DSLR or mirrorless camera, you may need to navigate to a menu to locate your ISO settings. On some cameras, this menu is your “quick menu.” Once you find the correct location, select the ISO values you want.
Higher-end cameras may feature a specific ISO button on the camera body. You may need to depress this button and spin a wheel to change ISO settings. If your camera doesn’t have a button labeled ISO, you may be able to program one to help you make easy ISO in camera adjustments.
You may have a camera with ISO depicted on a wheel with labeled stops. This is the easiest way to adjust your ISO.
Be sure to consult your camera manual to understand how to change ISO for your particular model. You should definitely know how to make ISO changes quickly so that you can adapt to varied shooting situations. After some trial and error, you’ll start to learn which camera ISO setting to choose in each scenario.
3. Find Out When to Use High or Low ISO Camera Settings
Knowing how to adjust ISO camera controls can help you make good decisions when taking pictures. While your base ISO setting can produce consistent quality, there are occasions when a high ISO camera setting is the only way to go.
If you are shooting in a situation where there is not enough light to capture photos, you will need to increase your ISO. This can occur indoors if you are shooting without a flash. You may also need to increase ISO when you are trying to capture moving subjects, such as athletes or wildlife. If you increase your ISO, you may be able to use a fast shutter speed to freeze action without introducing unwanted motion blur.
Another time you may want to raise ISO settings is when you are capturing deep depth of field. This occurs when you want to keep as much detail as possible in your image—such as when you are taking landscape shots. In those scenarios, you’ll want to use a small aperture setting and higher ISO.
Also, note that there is a relationship between shutter, sensor size, and ISO. If you have a DSLR or mirrorless camera with a larger sensor, you may be able to increase your camera ISO settings without compromising image quality. Mirrorless cameras are quite popular for this reason.
It’s important to know that increasing your ISO can lead to more noise in your photos. Noise is the appearance of blotchy colors and grains that can diminish the quality of your pictures.
Shooting at a low ISO is a good choice if you have enough lighting. Not only does a lower ISO help reduce noise, but it also allows you to achieve more vivid colors. It also improves dynamic range, which is the ability to capture more detail in both shadows and highlights.
If you’re shooting an image with a shallow depth of field—such as a portrait—you can choose a wider aperture and lower ISO setting. You’ll recognize photos with this shallow depth because the subject is in sharp focus, while the background is out-of-focus.
At times, you can use a low ISO indoors—but you’ll need to take some extra steps. First, you’ll need to use a slower shutter to allow more light to pass through your lens and hit your sensor. If you’re shooting handheld, this introduces some risk of camera shake since you’ll be increasing exposure time.
Minimize this issue by using a tripod or placing your camera on a stable structure, like a table. Keep this tip for a slower shutter setting in mind when shooting candid family photos indoors or if you move into a professional photography pursuit, such as real estate photography.
Setting Your Camera‘s ISO: Tips and Tricks
A first, selecting the right camera ISO controls can feel like a mystery. But with time, patience, and practice, you’ll find it becomes second nature. Here are a few tips to help you make good choices for camera ISO settings.
Experiment in Auto ISO Mode
Many cameras offer an auto camera ISO mode—which allows you to select a range of ISO settings. For example, you may select a range of 100 to 800. Your camera can make automatic adjustments based on lighting conditions. It will choose an ISO setting and a corresponding shutter speed to help you achieve good photos without introducing camera shake.
For example, if you are shooting during the golden hour—which is the first and last hour of daylight each day—auto ISO mode might be a good choice. The reason? Lighting changes will be changing quickly. You’ll want to be taking as many shots as possible to take advantage of the exceptional natural light conditions. Setting your ISO camera setting range will let you focus on photos, not making ISO adjustments.
Learn How to Make Adjustments Based on File Output Format
In most cases, you will need to select whether to save your images as JPEG or RAW files. A JPEG image is compressed, so you lose some opportunity for post-production edits. RAW files contain all the data captured by your sensor—so you can edit out noise if it occurs due to a high ISO. If you know you’ll need a high ISO, you may want to shoot RAW.
While JPEGs give you less post-production editing flexibility, you may be able to adjust some camera settings to minimize noise. Look for options to turn on noise reduction for high ISO or long exposure settings.
Keep ISO Low When Using a Flash
In most cases, you’ll be able to keep your ISO camera controls at a low setting when using a flash. Aim for an ISO camera rating between 100 and 400, if possible. Your flash should emit enough light to compensate for the low ISO. If you’re using a flash in lower light settings, you may need to bump the ISO to 800 or camera ISO 1,600.
A High ISO Can Produce Unique Vintage Effects
If you’re interested in taking vintage-look photography, you can test out taking photos with a high ISO. At higher ISO camera levels, you’ll see grainy, blotchy effects that can replicate the imperfect feel of old film photographs. Deliberately choosing a high ISO can create unique effects that you couldn’t achieve otherwise.
Use ISO Camera Controls to Adjust Image Brightness
What does ISO mean on a camera? Many people who are new to photography ask themselves that question. While ISO itself is a straightforward concept, it can take a while to learn how to adjust ISO camera controls and other key settings to achieve the looks you want for each image.
You should consult your manual to learn exactly how to adjust your camera ISO setting. Depending on your model, you may have to use a menu to find ISO on a camera, or you may see an ISO camera button on the body. Some cameras feature a wheel with labeled stops for each ISO camera setting.
After you learn how to set ISO, you can start exploring when to use a high or low ISO setting. Often, a lower camera ISO option is best if you have enough light since it allows you to take high-quality pictures. If you do need to opt for a high ISO setting, you may need to adjust camera aperture and shutter speed to ensure correct exposure. If you aren’t clear on aperture, shutter speed, and the exposure triangle, you should spend some time learning about these concepts, too.
Now you can answer the question: “What is camera ISO?” It’s time to experiment with your own photography. A theoretical understanding of ISO on camera is helpful, but the only way you’ll truly grasp the concept is through hands-on practice.